Accessing Hard Disk
As we all know, disks are consisted by sectors, and in general each sector is 512 bytes long.
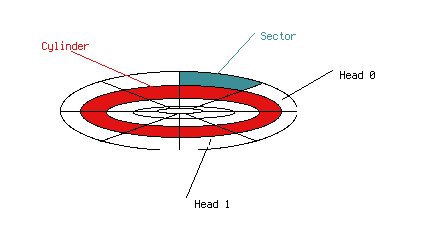
There are two common ways to locate a sector on disk, one is called CHS which simply stands for Cylinder, Head and Sector, it reflects the physical structure of disks.
The Sector is the minimal data block that hard disk can access directly on disks. Cylinder also called track contains certain amount of sectors
(18 sectors in 1.44M floppy disk, for hard disk, this value usually is 64), like its name saids, it is a circle at the same radius from the center.
Head indicates which side of the plate, because on disk can contains several plates, and each plate has two sides. Here is one plate of the hard disk,
Obviously, in CHS method, the capacity of the disk can be represented as (number of cylinders) * (number of heads per cylinder) * (number of sectors per head) * 512.
There is another thing I have to mention, for the number of cylinders and heads, they always start from 0, and sector starts from 1.
LBA(Linear Block Addressing), it is the logical addressing scheme of your physicial disks. Like the linear memory address, LBA also use linear
address to represent the sectors in the disk, cylinders and heads are not used any more. It is easier for user to use, but CHS is the method
that the driver recognizes, so we need to find a formula of translating CHS to LBA. We let linear sector addresses start from zero.
And another way around
C = LBA / (heads per cylinder * sectors per cylinder)
temp = LBA % (heads per cylinder * sectors per cylinder)
H = temp / sectors per cylinder
S = temp % sectors per cylinder + 1
You can get your CHS information from the BIOS of VMWARE or whatever the virtual machine you are using.
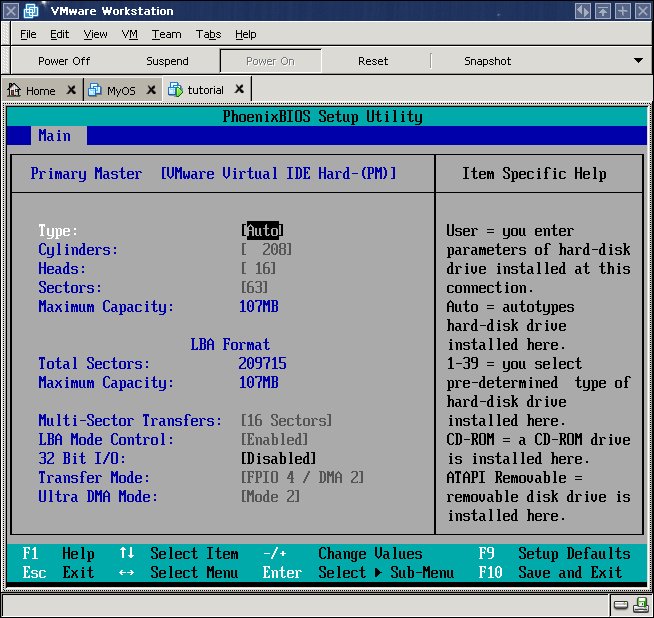
We can see the hard disk I am using have 208 cylinders, 16 heads and 64 sectors per cylinder. Let's put them into a structure like this,
07/dpt/hd.c
struct HD_PARAM {
unsigned int cyl;
unsigned int head;
unsigned int sect;
} HD0 = {208, 16, 63};
Because Skelix uses LBA addressing, so it has to translate the LBA address to CHS before accessing hard disk.
unsigned int cyl = lba/(HD0.head * HD0.sect);
unsigned int head = (lba%(HD0.head*HD0.sect))/HD0.sect;
unsigned int sect = (lba%(HD0.head*HD0.sect))%HD0.sect+1;
Now we get the CHS address, we are going to access disk using ports 0x1F0-0x1F7.
07/include/hd.h
#define HD_PORT_DATA 0x1f0
#define HD_PORT_ERROR 0x1f1
#define HD_PORT_SECT_COUNT 0x1f2
#define HD_PORT_SECT_NUM 0x1f3
#define HD_PORT_CYL_LOW 0x1f4
#define HD_PORT_CYL_HIGH 0x1f5
#define HD_PORT_DRV_HEAD 0x1f6
#define HD_PORT_STATUS 0x1f7
#define HD_PORT_COMMAND 0x1f7
It looks scary, but it can be grouped quite clearly, we read data from 0x1F0, if any error happens we get the error state from 0x1F1, we set secter number at 0x1F2 and 0x1F3,
0x1F4 and 0x1F5 are for cylinder number, clearly 0x1F6 for head, we read the hard disk status from port 0x1F7, we sent command like reading or writing to port 0x1F7.
#define HD_READ 0x20
#define HD_WRITE 0x30
To sum up, accessing a certain sector needs certain steps introduced below. I am not going to do many error checkings. This function hd_rw
is the interface which going to be used to access disk.
07/hd.c
while ((inb(HD_PORT_STATUS)&0xc0)!=0x40)
;
We keep checking the hard driver state till it is ready, the individual bit from this ports when it is set means,
| Bit 7 | controller is busy |
| Bit 6 | drive is ready |
| Bit 5 | write error |
| Bit 4 | seek completed |
| Bit 3 | sector buffer requires servicing |
| Bit 2 | disk data read corrected |
| Bit 1 | index - set to 1 each revolution |
| Bit 0 | previous command ended in an error |
keep going...
outb(sects_to_access, HD_PORT_SECT_COUNT);
outb(sect, HD_PORT_SECT_NUM);
outb(cyl, HD_PORT_CYL_LOW);
outb(cyl>>8, HD_PORT_CYL_HIGH);
outb(0xa0|head, HD_PORT_DRV_HEAD);
The port for head information is also used for selecting the hard disk,
| Bits 7-5 | must be 101b |
| Bit 4 | HD0(=0), HD1(=1) |
| Bits 3-0 | head number |
Keep going...
outb(com, HD_PORT_COMMAND);
com is the action we want the hard driver to do, they are defined as,
| HD_READ=0x20 | reading with retry if failed |
| HD_WRITE=0x30 | writing with retry if failed |
Keep going...
if (com == HD_READ)
insl(HD_PORT_DATA, buf, sects_to_access<<7);
else if (com == HD_WRITE)
outsl(buf, sects_to_access<<7, HD_PORT_DATA);
insl and outsl like inb and outb we used before,
except they read/write a certain length of data instead of one byte.
while ((inb(HD_PORT_STATUS)&0x80))
;
Ensure the work is done.
Actually, it only gives you a rough idea of accessing disks, it doesn't do many error checking, please be aware of that. However,
Skelix is not going to do any complexed operation, so it is okay at this moment :)
Disk Partitions
Now we have the ability of accessing any sectors on our disk, let's get all those sectors organized.
The first sector of the hard disk must contain the information about disk partitions. The disk partition table (DPT) starts from 0x1BE from the beginning of the first sector,
it is 64 bytes long contains information about four partitions. Needless to say, the following three partition entrys start from 0x1CE, 0x1DE and 0x1EE respectively, the fourth entry ends at 0x1FC,
and the 0x1FE should contain a word 0xAA55.
This table shows the format of each entry,
| Byte 0 | Boot indicator |
| Bytes 1-3 | CHS information |
| Byte 4 | Partition type |
| Bytes 5-7 | CHS information |
| Bytes 8-11 | Offset of staring sector |
Bytes 12-16
| Number of sectors in the partition |
Byte 0 defines if this partition is bootable, the valid value for a bootable partition is 0x80. In general one disk can only have one
bootable partition. byte 4 defines the type of the file system created on this partition, like FAT32, NTFS, ReiserFS etc., you can check here to get the full list of partition types.
Actually we can see (bytes 1-3, bytes 5-7) and (bytes 8-11, bytes 12-16) provides two possible ways to locate sectors on a partition,
(bytes 1-3, bytes 5-7) provide full information about CHS format, but I am not going to explain the details about those bytes because we are not going to use them.
About bytes 8-11, these 4-byte long integer provide the offset of the starting sector in this partition from the beginning of the disk,
and bytes 12-16 indicates how many sectors on this partition, and just sum them up then we will get the LBA address easily. In a nut shell,
the structure of DPT actually provides two ways to locate sectors, so in practice we can just choose one of them to manage our disks. So the second way is what we are going to use.
Let's set up the DPT,
06/dpt/hd.c
static void
setup_DPT(void) {
unsigned char sect[512] = {0};
sect[0x1be] = 0x80;
sect[0x1be + 0x04] = FST_FS;
*(unsigned long *)§[0x1be + 0x08] = 1;
*(unsigned long *)§[0x1be + 0x0c] = 85*1024*2; /* 85MB */
The first partition is a bootable normal file system, the type of this partition is defined as FST_FS, and the capacity of this partition is 85MB.
sect[0x1ce + 0x04] = FST_SW;
*(unsigned long *)§[0x1ce + 0x08] = 85*1024*2+1;
*(unsigned long *)§[0x1ce + 0x0c] = 16*1024*2; /* 16MB */
The second partition is a swap partition, it is going to be used in next tutorial.
sect[0x1fe] = 0x55;
sect[0x1ff] = 0xaa;
Signature.
hd_rw(0, HD_WRITE, 1, sect);
}
Don't forget to write it to the first sector. Function hd_rw, it takes the sector number as the first argument, and then second argument is very clear,
it is going to write, the third argument indicates how many sectors we are going to access, here is just one, then the last argument is the sectors buffer.
Let's take a look another function, it is going to print the partition information on booting.
void
verify_DPT(void) {
unsigned char sect[512];
unsigned i = 0;
unsignedintunsignedint
The starting address and length of each partition will be stored in HD0_ADDR after bootstrap.
hd_rw(0, HD_READ, 1, sect);
if ((sect[0x1fe]==0x55) && (sect[0x1ff]==0xaa)) {
Checks if it is a valid sector.
unsigned char *p = §[0x1be];
char *s;
kprintf(KPL_DUMP, " | Bootable | Type | Start Sector | Capacity \n");
for (i=0; i<4; ++i) {
kprintf(KPL_DUMP, " %d ", i);
/* system indicator at offset 0x04 */
if (p[0x04] == 0x00) {
kprintf(KPL_DUMP, "| Empty\n");
p += 16;
q += 2;
continue;
}
Check the bootable flag and file system type of this partition.
if (p[0x00] == 0x80)
s = "| Yes ";
else
s = "| No ";
kprintf(KPL_DUMP, s);
/* system indicator at offset 0x04 */
if (p[0x04] == FST_FS) {
kprintf(KPL_DUMP, "| Skelix FS ");
} else if (p[0x04] == FST_SW) {
kprintf(KPL_DUMP, "| Skelix SW ");
} else
kprintf(KPL_DUMP, "| Unknown ", *p);
/* starting sector number */
*q++ = *(unsigned long *)&p[0x08];
kprintf(KPL_DUMP, "| 0x%x ", *(unsigned long*)&p[0x08]);
/* capacity */
*q++ = *(unsigned long*)&p[0x0c];
kprintf(KPL_DUMP, "| %dM\n", (*(unsigned long*)&p[0x0c]*512)>>20);
p += 16;
}
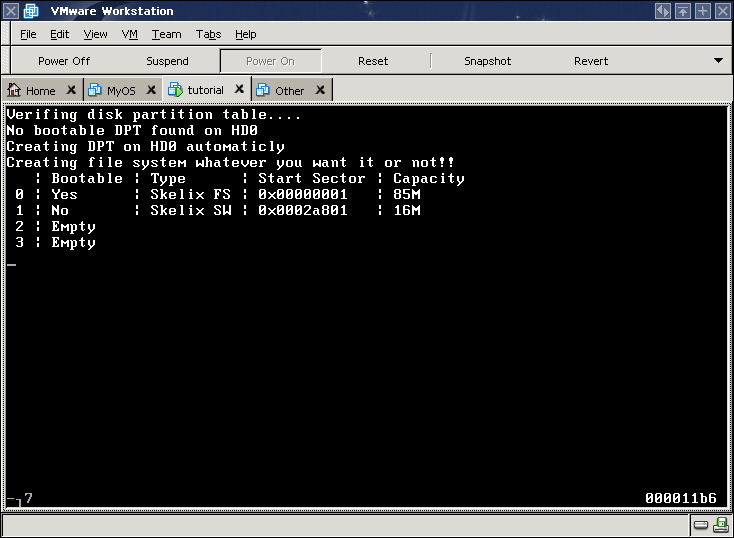
} else {
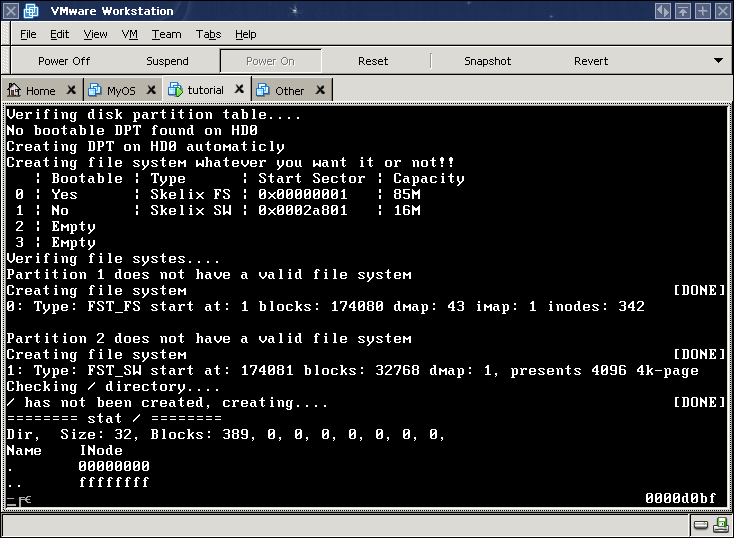
kprintf(KPL_DUMP, "No bootable DPT found on HD0\n");
kprintf(KPL_DUMP, "Creating DPT on HD0 automaticly\n");
kprintf(KPL_DUMP, "Creating file system whatever you want it or not!!\n");
setup_DPT();
verify_DPT();
}
}
Before we go on to see the result, we have to modify the code about task1_run and task2_run we used in last tutorial,
because they keep scrolling up the screen, and that makes us really not possible to watch the result printed by verify_DPT, so we change their's code to these,
void
do_task1(void) {
__asm__ ("incb 0xb8000+160*24+2");
}
void
do_task2(void) {
__asm__ ("incb 0xb8000+160*24+4");
}
we let task1_run keeps flipping the second character on the bottom line, and task2_run keeps flipping the third character at the bottom line.
Now we can get a clean screen for output. Modify the Makefile, add hd.o to KERNEL_OBJS, and add verify_DPT in
07/dpt/init.c right before sti().
07/dpt/Makefile
KERNEL_OBJS= load.o init.o isr.o timer.o libcc.o scr.o kb.o task.o kprintf.o hd.o exceptions.o
07/dpt/init.c
__asm__ ("ltrw %%ax\n\t"::"a"(TSS_SEL));
__asm__ ("lldt %%ax\n\t"::"a"(LDT_SEL));
kprintf(KPL_DUMP, "Verifing disk partition table....\n");
verify_DPT(); /* &&& Here it is */
sti();
Because after sti(), task swiching is enabled, and the new coming task might use the hard disk before it is set up properly.
Finally,
And please be aware of one thing, because we set up Skelix in a virtual machine, there is no other OS use this virtual hard disk, so we do not need to be worried about other system's partition,
just for simplicity, Skelix presume the first partition is for normal file system, and the second one is a swap partition.
File System
Since we got the partition organized, so let's organize the file system on each partition. Now we can access any sectors on partitions,
but that is not convenient to manage files, we have to get it more structured, so we have to introduce a new structure to present files.
07/fs/include/fs.h
#define FT_NML 1
#define FT_DIR 2
struct INODE {
unsigned int i_mode; /* file mode */
unsigned int i_size; /* size in bytes */
unsigned int i_block[8];
};
*nix-like users must be familiar with name inode, now I am going to explain each field in this structure. i_mode defines the type of this file,
Skelix is going to treat all files identically by using INODE, FT_NML indicates this file is a ordinary file, FT_DIR indicates this file is a directory.
i_size is simple, it is file size, the measurement of directory file will be explained later. The first 6 unsigned integer indicate first 6 sectors of the file,
that is 3KB, the 7th unsigned integer indicates the a sector which contains 512/4 = 128 sector numbers, they are the following 128 sectors in the file, that is 128*512 = 64KB,
the last unsigned integer indicates 512/4 = 128 entries and each entry works like the 7th integer in the array, so it can present 128*128*512 = 8MB,
so using this three level disk "pointers" we can have a 3+64+8*1024 = 8259KB file at maximum. It is small, but please be aware of our partition is only 85MB, so it is enough.
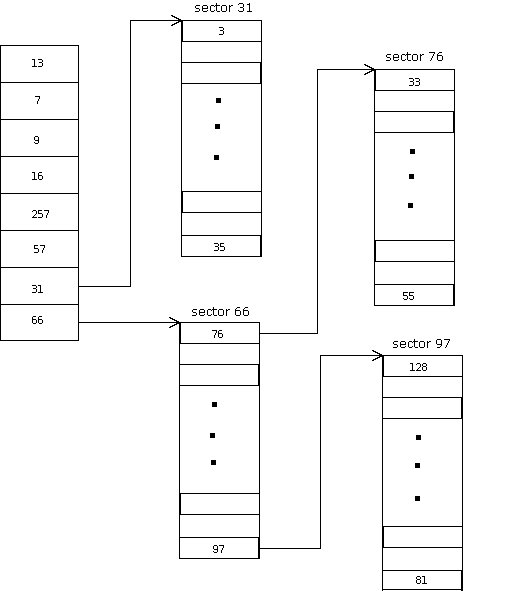
For example, above is a file's inode, then all its data contains in the sequence of sector 13, 7, 9, 16, 257, 57, 3, ....., 35, 33, ....., 55, ......., 128, ....., 81
For the directory file, it is constructed like an array in the structure of {{file_name, file_inode}, {file_name, file_inode}, {file_name, file_inode}, }
#define MAX_NAME_LEN 11
struct DIR_ENTRY {
char de_name[MAX_NAME_LEN];
int de_inode;
};
All files in system has a unique file inode number, so if we have the inode number, then we can find the file.
The first two files as you may guess are "." and "..", represent current directory and the upper directory, so if we go downward, we can find every file include directories in this directory,
and if we go up we can find its parent etc. The top level of directory hierarchy is /, it does not have valid parent.
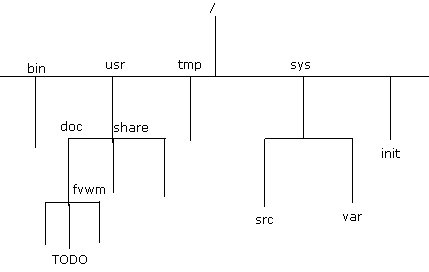
For example, if we want to locate TODO file at /usr/doc/fvwm/TODO, then at first we find / file,
and search all its entries to find doc file, it is a directory, so we get it's inode number from / file and search the inodes
table at somewhere, then we earch its content till we find the next path portion fvwm, then search its inode number
again at somewhere, then search file fvwm till we find the ordinary file TODO and its inode number pair,
then again we search some where to locate its inode structure by its inode number, then finally we can access the i_block array, that means we can access this file.
So as you can see, there are two problems, one is there must be somewhere for system to look for inode by inode number, so we manage all inodes in system into a array on disk,
and make the inode number to be the index of the inode array, another problem is / does not have parent, so we have to know the certain place to locate the inode of /,
that's fairly easy actually, we can just make / own the first entry of the inode array, then its inode number will always be zero. Actually, there is another tiny but really annoy stuff,
we have to define the length of maximum file name, because the number of inode is going to be presented as an integer, so that is 4 bytes, then we make the maximum file length to be 12 bytes,
so we get 16-byte entries in directory file, that is convenient for management and disk I/O.
After some file creations and deletions, some inodes are used and others are not, but how can we tell that, well, we are going to make a bitmap about inode array,
one bit refers to one entry in the inode array, once an inode is used, then set the corresponding bit, when it is freed, then unset it.
The same problem exists in manage free sectors, we will use another bitmap refers to which sectors on disk have been used, and which are free.
07/fs/include/fs.h
struct SUPER_BLOCK {
unsigned char sb_magic;
Type of the partition, FST_FS or FST_SW
/* DPT 0x08 */
unsigned int sb_start;
Start sector number
/* DPT 0x0c */
unsigned int sb_blocks;
The capacity of this partition, count in sectors
unsigned int sb_dmap_blks;
How many blocks we have to use to contain the bitmap of blocks (in Skelix, one block is one sector)
unsigned int sb_imap_blks;
How many blocks we have to use to contain bitmap of inode array
unsigned int sb_inode_blks;
How many blocks we use for inode array
This structure is used to manage super block information on each partition.
To sum up, we should have a disk image like this,
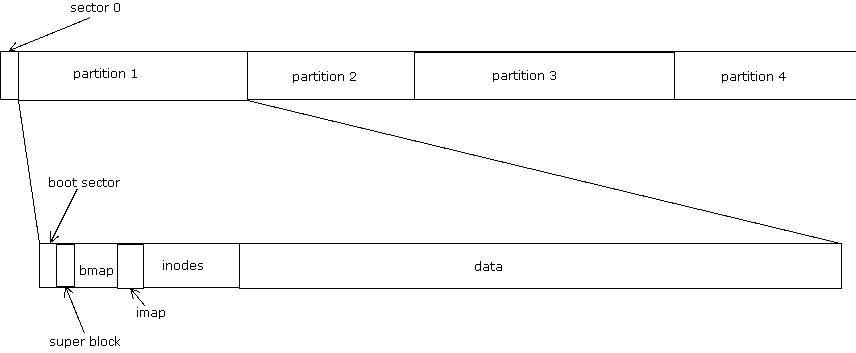
The first sector of each partition is a boot sector, but I am not going to use it, and the second sector contains the super block,
then the dmap follows, then imap and inodes, user's data stores after all those stuff.
Let's define these macros for convenience. sb is the partition's SUPER_BLOCK structure,
we use these macros to get the LBA address of certain sector for the use of hd_rw function.
#define ABS_BOOT_BLK(sb) ((sb).sb_start)
#define ABS_SUPER_BLK(sb) ((ABS_BOOT_BLK(sb))+1)
#define ABS_DMAP_BLK(sb) ((ABS_SUPER_BLK(sb))+1)
#define ABS_IMAP_BLK(sb) ((ABS_DMAP_BLK(sb))+(sb).sb_dmap_blks)
#define ABS_INODE_BLK(sb) ((ABS_IMAP_BLK(sb))+(sb).sb_imap_blks)
#define ABS_DATA_BLK(sb) ((ABS_INODE_BLK(sb))+INODE_BLKS)
#define INODE_BIT_BLKS 1 /* 512*8 = 4096 inodes */
#define INODES_PER_BLK (512/sizeof(struct INODE))
#define INODE_BLKS ((INODE_BIT_BLKS*512*8+INODES_PER_BLK-1)/(INODES_PER_BLK))
These blocks are reserved by Skelix. Now we have the rough idea of the partition look like, then let's take a look at the code. Bitmaps also make those bitwise operation easier,
07/fs/fs.c
void
setb(void *s, unsigned int i) {
unsigned char *v = s;
v += i>>3;
*v |= 1<<(7-(i%8));
}
void
clrb(void *s, unsigned int i) {
unsigned char *v = s;
v += i>>3;
*v &= ~(1<<(7-(i%8)));
}
int
testb(void *s, unsigned int i) {
unsigned char *v = s;
v += i>>3;
return (*v&(1<<(7-(i%8)))) !=0;
}
For example, by calling setb(sect, 1796) sets 1796th bit in bitmap, offset starts from 0, clrb
is for clear a bit, testb is for test if a bit is (un)set.
void
verify_fs(void) {
unsignedintunsignedint
unsigned char sect[512] = {0};
struct SUPER_BLOCK sb;
unsigned int i = 0, j = 0, m = 0, n = 0;
/* get the fs sb */
sb.sb_start = q[0];
hd_rw(ABS_SUPER_BLK(sb), HD_READ, 1, &sb);
Reads the super block of first partition, it should be the ordinary file system.
/* the first partition must be FST_FS type */
if (sb.sb_magic != FST_FS) {
We setup the filesystem at the first boot.
kprintf(KPL_DUMP, "Partition 1 does not have a valid file system\n");
kprintf(KPL_DUMP, "Creating file system\t\t\t\t\t\t\t ");
sb.sb_magic = FST_FS;
sb.sb_start = q[0];
sb.sb_blocks = q[1];
sb.sb_dmap_blks = (sb.sb_blocks+0xfff)>>12;
sb.sb_imap_blks = INODE_BIT_BLKS;
sb.sb_inode_blks = INODE_BLKS;
hd_rw(ABS_SUPER_BLK(sb), HD_WRITE, 1, &sb);
Fills in the SUPER_BLOCK structure and write it to disk. Please be aware of this, in dmap block, each bit presents a sector, so one dmap sector can
present 512*8 = 2^12 sectors, and we simply did a bitwise operation. For simplicity, we defined every partition has a fixed number of inodes, we define every partition use one secter as
imap, so it can present 512*8 inodes which is INODE_BIT_BLKS=1, and one sector can contain 512/sizeof(struct INODE) inodes,
so we need INODE_BLKS=((INODE_BIT_BLKS+INODES_PER_BLK-1)/(INODES_PER_BLK)) sectors for inodes array.
/* initial data bitmap */
n = ABS_DMAP_BLK(sb);
j = sb.sb_dmap_blks+sb.sb_imap_blks+sb.sb_inode_blks+2;
memset(sect, 0xff, sizeofsizeof
for (i=j/(512*8); i>0; --i) {
hd_rw(n++, HD_WRITE, 1, sect);
m += 4096;
}
m += 4096;
for (i=j%(512*8); i<512*8; ++i) {
clrb(sect, i);
--m;
}
hd_rw(n++, HD_WRITE, 1, sect);
memset(sect, 0, sizeofsizeof
for (i=sb.sb_imap_blks-(n-ABS_DMAP_BLK(sb)); i>0; --i)
hd_rw(n++, HD_WRITE, 1, sect);
/* initail inode bitmap */
for (i=sb.sb_imap_blks; i>0; --i)
hd_rw(ABS_IMAP_BLK(sb)+i-1, HD_WRITE, 1, sect);
/* initial inode blocks */
for (i=sb.sb_inode_blks; i>0; --i)
hd_rw(ABS_INODE_BLK(sb)+i-1, HD_WRITE, 1, sect);
kprintf(KPL_DUMP, "[DONE]");
Playing with bits, filling the dmap and imap, setting all sectors which occupied by boot sector, super block, imap, dmap and inodes to 1 in dmap.
}
q += 2;
kprintf(KPL_DUMP, "0: Type: FST_FS ");
kprintf(KPL_DUMP, "start at: %d ", sb.sb_start);
kprintf(KPL_DUMP, "blocks: %d ", sb.sb_blocks);
kprintf(KPL_DUMP, "dmap: %d ", sb.sb_dmap_blks);
kprintf(KPL_DUMP, "imap: %d ", sb.sb_imap_blks);
kprintf(KPL_DUMP, "inodes: %d\n", sb.sb_inode_blks);
/* initialize swap partition */
sb.sb_start = q[0];
hd_rw(ABS_SUPER_BLK(sb), HD_READ, 1, &sb);
if (sb.sb_magic != FST_SW) {
The second partition is a swap partition used for virtual memory, I will explain it in the following tutorial. At this moment all we have to know is every 4k disk space
is grouped as one unit, we do not need imap and inode in this partition, so that will be fairly easy,
kprintf(KPL_DUMP, "\nPartition 2 does not have a valid file system\n");
kprintf(KPL_DUMP, "Creating file system\t\t\t\t\t\t\t ");
sb.sb_magic = FST_SW;
sb.sb_start = q[0];
sb.sb_blocks = q[1];
sb.sb_dmap_blks = (sb.sb_blocks)>>15; /* 1 bits == 4K page */
hd_rw(ABS_SUPER_BLK(sb), HD_WRITE, 1, &sb);
kprintf(KPL_DUMP, "[DONE]");
}
/* initial data bitmap */
n = ABS_DMAP_BLK(sb);
j = sb.sb_dmap_blks+2;
memset(sect, 0xff, sizeofsizeof
for (i=j/(512*8); i>0; --i) {
hd_rw(n++, HD_WRITE, 1, sect);
m += 4096;
}
m += 4096;
for (i=j%(512*8); i<512*8; ++i) {
clrb(sect, i);
--m;
}
hd_rw(n++, HD_WRITE, 1, sect);
There is another difference, once we boot up the system, we clear all bits in bmap, so we do not keep any information in disk, the reason for doing that will be explained in next tutorial.
kprintf(KPL_DUMP, "1: Type: FST_SW ");
kprintf(KPL_DUMP, "start at: %d ", sb.sb_start);
kprintf(KPL_DUMP, "blocks: %d ", sb.sb_blocks);
kprintf(KPL_DUMP, "dmap: %d, presents %d 4k-page\n",
sb.sb_dmap_blks, sb.sb_blocks>>3);
}
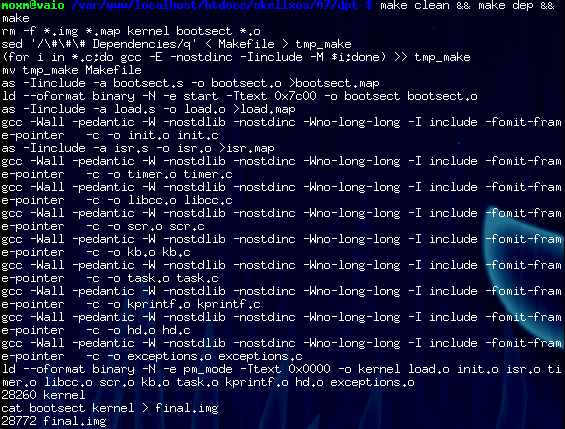
Don't forget to modify Makefile, add fs.o into KERNEL_OBJS, then make clean && make dep && make
07/fs/Makefile
KERNEL_OBJS= load.o init.o isr.o timer.o libcc.o scr.o kb.o task.o kprintf.o hd.o\
exceptions.o fs.o

root
The last thing left in this tutorial is to set up the root directory, the / directory is the root of all files,
so we have to locate it at the boot time for searching other files.
/ file always use inode 0, then the Skelix knows where to find it, it can read the content of / file,
that is a array of DIR_ENTRY, then Skelix can locate files just under / directory.
By keep doing this, it traversals all files in the whole file system hierarchy.
Before we check out the code about creating / file, we have to take a look at several functions which is manipulating blocks and inodes on file system,
07/root/fs.c
static structsizeof(struct
unsigned int
alloc_blk(struct SUPER_BLOCK *sb) {
This function locates the first free block on disk, then return the LBR address which is start from the beginning of whole disk, actually this is what we are going to use in kernel,
all disk addresses is an absolute LBR address starts from the beginning of whole disk instead of separate partitions.
unsigned int i = 0, j = 0, n = 0, m = 0;
unsigned char sect[512] = {0};
n = ABS_DMAP_BLK(*sb);
for (; i<sb->sb_dmap_blks; ++i) {
hd_rw(n, HD_READ, 1, sect);
for (j=0; j<512*8; ++j) {
if (testb(sect, j)) {
++m;
} else { /* gotcha */
setb(sect, j);
if (m >= sb->sb_blocks)
return 0;
else {
hd_rw(n, HD_WRITE, 1, sect);
return ABS_BOOT_BLK(*sb) + m;
}
}
}
++n;
}
return 0;
}
void
free_blk(struct SUPER_BLOCK *sb, unsigned int n) {
unsigned char sect[512] = {0};
unsigned int t = (n-ABS_BOOT_BLK(*sb))/(512*8)+ABS_DMAP_BLK(*sb);
hd_rw(t, HD_READ, 1, sect);
clrb(sect, (n-ABS_BOOT_BLK(*sb))%(512*8));
hd_rw(t, HD_WRITE, 1, sect);
}
static int
alloc_inode(struct SUPER_BLOCK *sb) {
unsigned char sect[512] = {0};
int i = 0;
hd_rw(ABS_IMAP_BLK(*sb), HD_READ, 1, sect);
for (; i<512; ++i) {
if (! testb(sect, i)) {
setb(sect, i);
hd_rw(ABS_IMAP_BLK(*sb), HD_WRITE, 1, sect);
break;
}
}
return (i==512)?-1:i;
}
static void
free_inode(struct SUPER_BLOCK *sb, int n) {
unsigned char sect[512] = {0};
hd_rw(ABS_IMAP_BLK(*sb), HD_READ, 1, sect);
clrb(sect, n);
hd_rw(ABS_IMAP_BLK(*sb), HD_WRITE, 1, sect);
}
alloc_inode and free_inode pairs work as same as alloc_blk and free_blk except it manipulates inodes.
static struct INODE *
iget(structstructint n) {
unsigned char sect[512] = {0};
int i = n/INODES_PER_BLK;
int j = n%INODES_PER_BLK;
hd_rw(ABS_INODE_BLK(*sb)+i, HD_READ, 1, sect);
memcpy(inode, sect+j*sizeofstructsizeofstruct
return inode;
}
static void
iput(structstructint n) {
unsigned char sect[512] = {0};
int i = n/INODES_PER_BLK;
int j = n%INODES_PER_BLK;
hd_rw(ABS_INODE_BLK(*sb)+i, HD_READ, 1, sect);
memcpy(sect+j*sizeofstructsizeofstruct
hd_rw(ABS_INODE_BLK(*sb)+i, HD_WRITE, 1, sect);
}
iget reads an inode from disk with a given inode number to memory and iput writes an inode from memory to disk.
The meaning of those six functions are very clear, even though their code are not:(. Be aware of those functions do not handle race condition, because they are only used by kernel
to set up the system, user tasks should use system calls which will be introduced in later tutorial.
static void
check_root(void) {
struct SUPER_BLOCK sb;
unsigned char sect[512] = {0};
struct DIR_ENTRY *de = NULL;
sb.sb_start = *(unsigned int *)(HD0_ADDR);
hd_rw(ABS_SUPER_BLK(sb), HD_READ, 1, sect);
memcpy(&sb, sect, sizeof(struct SUPER_BLOCK));
hd_rw(ABS_IMAP_BLK(sb), HD_READ, 1, sect);
We load the imap block to memory, if the / file has been created, then the first bit of imap should be set.
if (! testb(sect, 0)) {
kprintf(KPL_DUMP, "/ has not been created, creating....\t\t\t\t\t ");
if (alloc_inode(&sb) != 0) {
kprintf(KPL_PANIC, "\n/ must be inode 0!!!\n");
halt();
}
/ must use inode 0, if this inode has been allocated, then some wrong has happened.
iroot.i_block[0] = alloc_blk(&sb);
iput(&sb, &iroot, 0);
we write the inode of / to disk, it has been set to the directory type, it has the length of two DIR_ENTRY
because one is '.' and the another one is '..'.
Then we allocate a free block on disk and set it to the first block of / file.
de = (struct DIR_ENTRY *)sect;
strcpy(de->de_name, ".");
de->de_inode = 0;
++de;
strcpy(de->de_name, "..");
de->de_inode = -1;
hd_rw(iroot.i_block[0], HD_WRITE, 1, sect);
Well, we filled the first block with correct information in format of {{".", 0}, {"..", -1}}, we let the inode of root's parent to be an invalid value -1,
so we can know we reach the top of the file system hierarchy tree, we cannot go up anymore.
kprintf(KPL_DUMP, "[DONE]");
}
iget(&sb, &iroot, 0);
hd_rw(iroot.i_block[0], HD_READ, 1, sect);
de = (struct DIR_ENTRY *)sect;
if ((strcmp(de[0].de_name, ".")) || (de[0].de_inode) ||
(strcmp(de[1].de_name, "..")) || (de[1].de_inode) != -1) {
kprintf(KPL_PANIC, "File system is corrupted!!!\n");
halt();
}
}
We use function stat to check file information.
static void
stat(struct INODE *inode) {
unsigned int i = 0;
char sect[512] = {0};
struct DIR_ENTRY *de;
kprintf(KPL_DUMP, "======== stat / ========\n");
switch (inode->i_mode) {
case FT_NML:
kprintf(KPL_DUMP, "File, ");
break;
case FT_DIR:
kprintf(KPL_DUMP, "Dir, ");
break;
default:
kprintf(KPL_PANIC, "UNKNOWN FILE TYPE!!");
halt();
}
Print the type of file, it must be one of FT_NML and FT_DIR.
kprintf(KPL_DUMP, "Size: %d, ", inode->i_size);
kprintf(KPL_DUMP, "Blocks: ");
for (; i<8; ++i)
kprintf(KPL_DUMP, "%d, ", inode->i_block[i]);
hd_rw(inode->i_block[0], HD_READ, 1, sect);
switch (inode->i_mode) {
case FT_DIR:
kprintf(KPL_DUMP, "\nName\tINode\n");
de = (struct DIR_ENTRY *)sect;
for (i=0; i<inode->i_size/sizeof(struct DIR_ENTRY); ++i) {
kprintf(KPL_DUMP, "%s\t%x\n", de[i].de_name, de[i].de_inode);
}
For directories, it prints all entries in the first block.
break;
default:
break;
}
}
Finally, let's put them together,
void
verify_dir(void) {
unsigned char sect[512] = {0};
unsignedintunsignedint
struct INODE inode;
struct SUPER_BLOCK sb;
sb.sb_start = q[0];
hd_rw(ABS_SUPER_BLK(sb), HD_READ, 1, sect);
check_root();
memcpy(&sb, sect, sizeof(struct SUPER_BLOCK));
stat(iget(&sb, &inode, 0));
}
Then put verify_dir into 07/root/init.c, let it just after verify_fs().
07/root/init.c
kprintf(KPL_DUMP, "Verifing disk partition table....\n");
verify_DPT();
kprintf(KPL_DUMP, "Verifing file systes....\n");
verify_fs();
kprintf(KPL_DUMP, "Checking / directory....\n");
verify_dir();
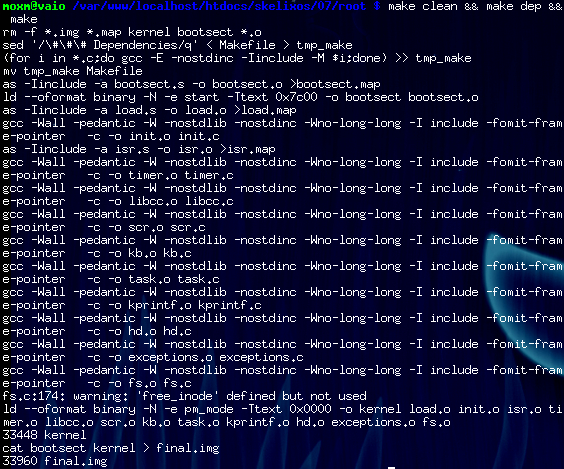
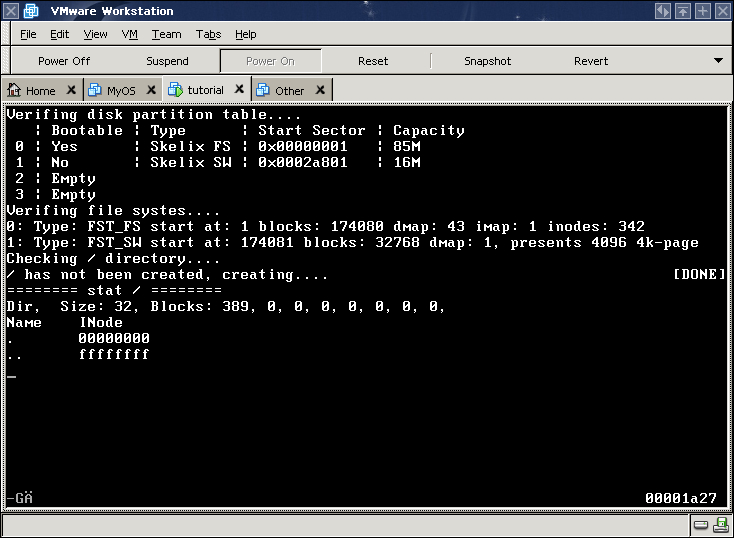
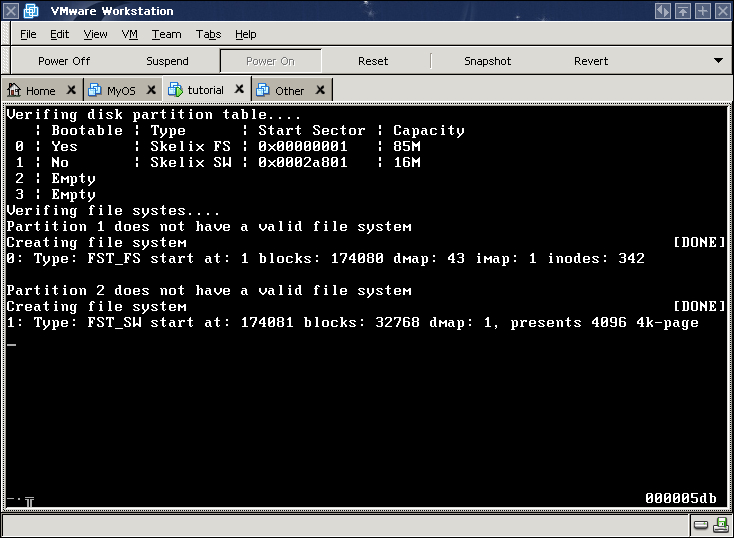
If you are using a newly allocated disk in this virtual machine, then you can see,
Exactly one screen, woo!